Lesson 15: AI Coding Assistance#
This lesson was generated with assistance from Jupter AI using ChatGPT 3.5 Turbo.
![]()
Note: This lesson is based on the older version of Jupyter AI with Python 3.11. The new version of Jupyter AI has more seamless integration with Jupyter Notebook and much easier to use compared to the older version. This ai magic commands are not that much needed in the new version.
Overview#
Using an AI code assistant, we will explore the use of generative AI models, mainly language models (LMs) such as ChatGPT, in Jupyter. This is to perform various coding tasks such as generating, completing, debugging, explaining, formatting, and optimizing Python codes. By the end of this lesson, you will be able to:
explain the pros and cons of generative AI in enhancing your Python learning and productivity
use a generative AI model such as ChatGPT in Jupyter through an AI code assistant such as Jupyter AI
chat with and perform coding tasks in Jupyter with a generative AI model of your choice
utilize multiple generative AI models in an open crowdsourced environment with Chatbot Arena (optional)
%load_ext jupyter_ai
from ai_assistant import api_key  #Import api_key module
api_key.set_API_key('OPENAI')     #Set API key for selected Provider: 'OPENAI' and 'ANTHROPIC'
1. Introduction#
1.1 Generative AI to enhance your Python learning and productivity#
Generative AI refers to artificial intelligence capabilities that can generate new content and insights automatically. In this lesson, we will explore how generative AI within the Jupyter notebook environment can augment human capabilities, and enhance learning and productivity.
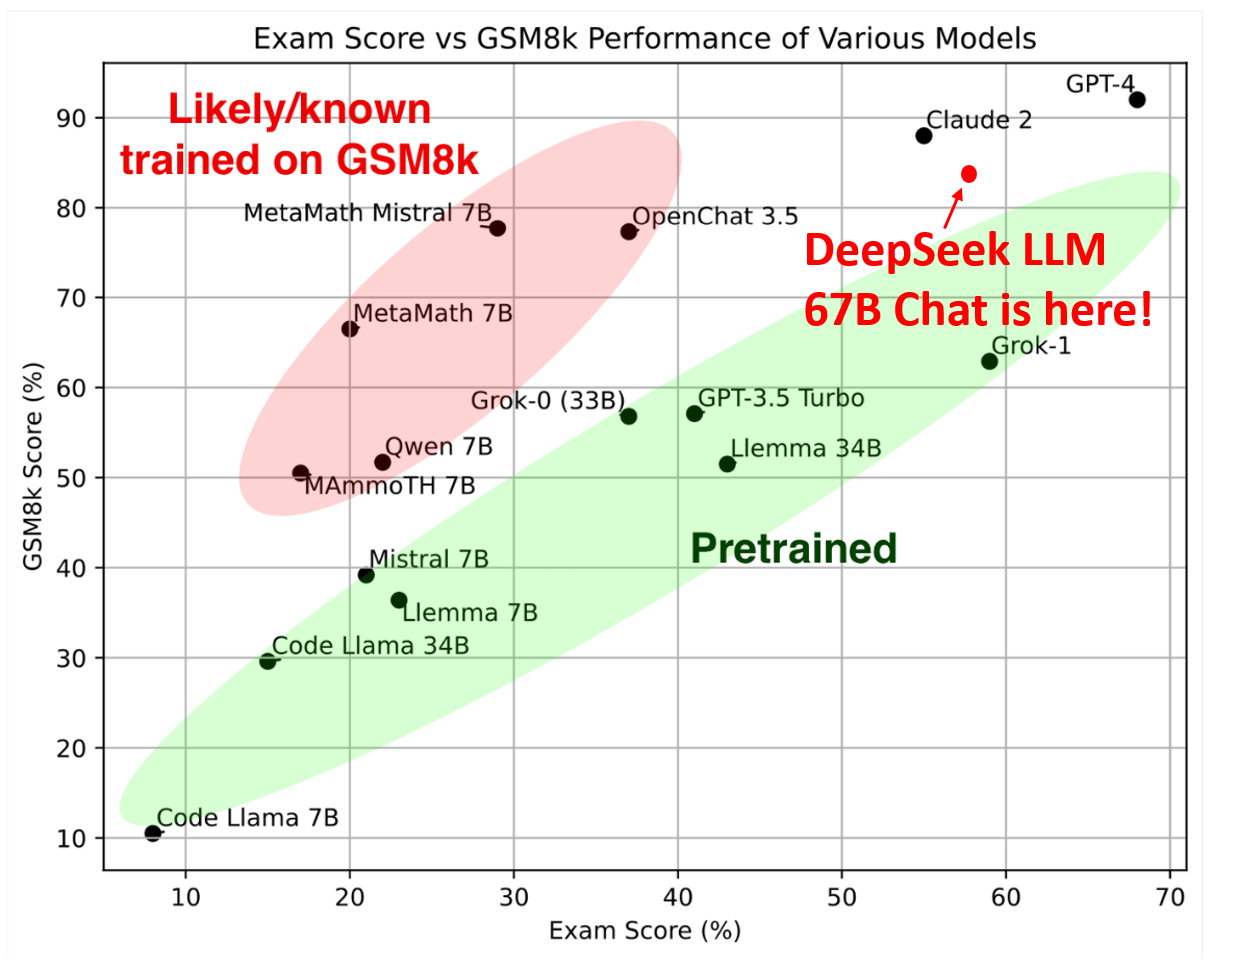
AI - Language models (LMs) have different capabilities with respect to reasoning, coding, mathematics, and language comprehension. This figure shows proficiency in mathematics (GSM8K Score) and model’s generalisation abilities (Exam Score) on the Hungarian National High School Exam (Image Credit: DeepSeek-LLM)
1.2 AI code assistant#
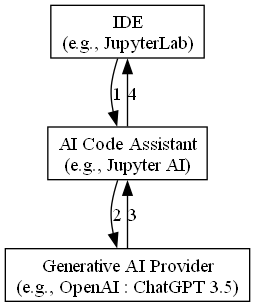
AI code assistants such as Jupyter AI leverage generative AI models from different providers such as OpenAI : ChatGPT within an IDE environment such as JupyterLab. An AI code assistant will provide:
prompt engineering with respect to your programming language,
context-aware code suggestions, completions, debugging, formatting, explaination and generation
chat user-interface to ask question and get help on related topics such as installation troubleshooting
and many more
This is to improvde learning and productivitiy.
1.3 Gallery of AI code assistants#
Selecting an AI code assistant depends on factors such as language support, integration with preferred IDEs, customization options, accuracy in suggestions, real-time feedback, resource efficiency, and cost considerations as shown in the table.
AI Code Assistant |
Providers: Models |
Compatible IDE |
Pros |
Cons |
Use-fee |
|---|---|---|---|---|---|
AI21, Anthropic, AWS, Cohere, Hugging Face, NVIDIA, OpenAI and more (via third-party plugins) |
1. Seamless Jupyter integration |
1. Not user-friendly |
Free but generative AI models may not be free |
||
[OpenAI: ChatGPT](OpenAI |
Impressive and user-friendly code assistant features |
1. No longer maintained and advise to switch to Jupyter AI |
Free but generative AI models may not be free |
||
Amazon: In-house AI models |
JupyterLab, PyCharm, and VSCode |
1. Seamless Jupyter integration |
Installation build error may occure |
Individual Tier is free for individual use |
|
OpenAI: Codex |
1. Powerful and mature code assistant |
No Jupyter integration |
Free for students and educators |
Here we will use Jupyter AI, but you can also experiment with other ones.
2. Jupyter AI Extension#
This section is modefied from jupyter-ai documentation. You can also check the YouTube video AWS re:Invent 2023 - Jupyter AI where the developers introduce this tool.
2.1 Overview#
Jupyter AI connects generative AI models with Jupyter notebooks, which can enhance your learning and productivity. Specifically, Jupyter AI:
turns your notebook into generative AI playground
provides chat user-interface in JupyterLab for chatting with your generative AI model
supports a wide range of generative model providers including AI21, Anthropic, AWS, Cohere, Hugging Face, NVIDIA, and OpenAI
allows users to run generative AI models on their own machines through GPT4All rather than relying on cloud-based services.
In this section we will learn the first two points with focus on ChatGPT3.5 Turbo of OpenAI.
2.2 Installing Jupyter AI#
2.2.1 Installation Steps#
Steps to install Jupyter AI:
Open an Anaconda Prompt (Anaconda3) or Anaconda Prompt (Miniconda3)
It is not a bad idea to update your pip before installing a new package
pip install --upgrade pip
Then you can install Python Jupyter AI with pip:
pip install jupyter-ai
Alternatively, you can use install this extension with a conda. Details on installing and using Jupyter AI can be found on Jupyter AI official documentation. The above steps should work for windows and linux users. For mac users, you need to do more steps as shown on jupyter-ai GitHub repository.
2.2.2 Installation Troubeshooting#
The Chat UI on the left menu may not work you will get this error message:
There seems to be a problem with the Chat backend, please look at the JupyterLab server logs or contact your administrator to correct this problem.
You might need to install few extra packages such as langchain_nvidia_ai_endpoints and cohere, and restart your computer. Check this stackoverflow post for details.
2.3 Loading Jupyter AI magic commands#
To use Jupyter AI, you need enable the %ai and %%ai magic commands in your notebook.
What is a magic command? Ask your LLM.
# # Load extension
# %load_ext jupyter_ai
2.4 Select provider#
Jupyter AI supports a wide range of model providers and models. To use Jupyter AI with a particular provider, you must install its Python plugins for that provider and set the provider’s API key (or other credentials) in your notebook or in the Jupyter AI Chat user-interface (UI) at the left menu.
You can view the available providers and models as follows:
# List available LM
%ai list
| Provider | Environment variable | Set? | Models |
|———-|———————-|——|——–|
| ai21 | AI21_API_KEY | ❌ |
ai21:j1-largeai21:j1-grandeai21:j1-jumboai21:j1-grande-instructai21:j2-largeai21:j2-grandeai21:j2-jumboai21:j2-grande-instructai21:j2-jumbo-instruct
azure-chat-openai | AZURE_OPENAI_API_KEY | ❌ | This provider does not define a list of models. |
| gemini | GOOGLE_API_KEY | ❌ | gemini:gemini-1.5-progemini:gemini-1.5-flashgemini:gemini-1.0-progemini:gemini-1.0-pro-001gemini:gemini-1.0-pro-latestgemini:gemini-1.0-pro-vision-latestgemini:gemini-progemini:gemini-pro-vision
gpt4all | Not applicable. | N/A | gpt4all:ggml-gpt4all-j-v1.2-jazzygpt4all:ggml-gpt4all-j-v1.3-groovygpt4all:ggml-gpt4all-l13b-snoozygpt4all:mistral-7b-openorca.Q4_0gpt4all:mistral-7b-instruct-v0.1.Q4_0gpt4all:gpt4all-falcon-q4_0gpt4all:wizardlm-13b-v1.2.Q4_0gpt4all:nous-hermes-llama2-13b.Q4_0gpt4all:gpt4all-13b-snoozy-q4_0gpt4all:mpt-7b-chat-merges-q4_0gpt4all:orca-mini-3b-gguf2-q4_0gpt4all:starcoder-q4_0gpt4all:rift-coder-v0-7b-q4_0gpt4all:em_german_mistral_v01.Q4_0
huggingface_hub | HUGGINGFACEHUB_API_TOKEN | ❌ | See https://huggingface.co/models for a list of models. Pass a model’s repository ID as the model ID; for example, huggingface_hub:ExampleOwner/example-model. |
| openai | OPENAI_API_KEY | ✅ | openai:babbage-002openai:davinci-002openai:gpt-3.5-turbo-instruct
openai-chat | OPENAI_API_KEY | ✅ | openai-chat:gpt-3.5-turboopenai-chat:gpt-3.5-turbo-1106openai-chat:gpt-4openai-chat:gpt-4-turboopenai-chat:gpt-4-turbo-previewopenai-chat:gpt-4-0613openai-chat:gpt-4-0125-previewopenai-chat:gpt-4-1106-previewopenai-chat:gpt-4oopenai-chat:gpt-4o-2024-11-20openai-chat:gpt-4o-miniopenai-chat:chatgpt-4o-latest
openrouter | OPENROUTER_API_KEY | ❌ | This provider does not define a list of models. |
| qianfan | QIANFAN_AK, QIANFAN_SK | ❌ | qianfan:ERNIE-Botqianfan:ERNIE-Bot-4
togetherai | TOGETHER_API_KEY | ❌ | togetherai:Austism/chronos-hermes-13btogetherai:DiscoResearch/DiscoLM-mixtral-8x7b-v2togetherai:EleutherAI/llemma_7btogetherai:Gryphe/MythoMax-L2-13btogetherai:Meta-Llama/Llama-Guard-7btogetherai:Nexusflow/NexusRaven-V2-13Btogetherai:NousResearch/Nous-Capybara-7B-V1p9togetherai:NousResearch/Nous-Hermes-2-Yi-34Btogetherai:NousResearch/Nous-Hermes-Llama2-13btogetherai:NousResearch/Nous-Hermes-Llama2-70b
Aliases and custom commands:
| Name | Target |
|——|——–|
| gpt2 | huggingface_hub:gpt2 |
| gpt3 | openai:davinci-002 |
| chatgpt | openai-chat:gpt-3.5-turbo |
| gpt4 | openai-chat:gpt-4 |
| ernie-bot | qianfan:ERNIE-Bot |
| ernie-bot-4 | qianfan:ERNIE-Bot-4 |
| titan | bedrock:amazon.titan-tg1-large |
| openrouter-claude | openrouter:anthropic/claude-3.5-sonnet:beta |
The environment variable names of API-keys are used when setting up a model. If multiple variable names are listed for a provider, all must be specified. Check Jupyter AI offical documentation for information about how to use each of the above listed providers.
The label Set is
✅ if you provided the API-key for that provider
❌ if you did not provide the API-key for that provider
N/A if the provider does not require API-key
The label Models shows the provider_name:model_name.
Aliases are are nicknames for models. For example, typing chatgpt is the same as typing openai-chat:gpt-3.5-turbo.
2.5 Install provider plugins#
You need to select your language model, and you can also select an embedding model.
A language model are typically pre-trained.
An embedding model is used when learning and asking about local data.
You can select language model and embedding model through the Jupyter AI Chat interface at the left menu or manually. However, Jupyter AI requires third-party plugins, so before we use a model, we need to install the Python plugins for that model or provider.
The provider that we will select is OpenAI that is the developer of ChaTGPT 3.5 Turbo and many other LLMs. For other providers, you need to check the required plugins.
# Uncomment and run the command below to install openAI plugins
#!pip install openai
2.6 Get API-key for the selected provider#
To be able to use Jupyter AI for a given notebook, you need to do the environment variable authentication in that notebook using your unique API-key. API-key is a special code that grants users access to the provider services. This code is like a password, so you should not share this code with anyone.
For this lesson the provider is OpenAI, but you can select any other provider of your choice. You need to create an OpenAI account to get OpenAI API key. It will be free for a period of time, and then you can add a credit card number to get charged for your usage of paid services. This GitHub file provides information about OpenAI API Key and how to get OpenAI API Key.
2.7 Set API-key for the select provider#
One on the drawbacks of Jupyter AI environment variable authentication through the Chat UI may be insufficent, and you need to do environment variable authentication using your unique API-key in the notebook.
3.7.1 Option 1: Reading your API key from the notebook#
Pros: Convenient
Cons: Security risk; Ensure to remove your API key before sharing the notebook
To set API key from your notebook, you need to import the operating system module os and use os.environ['Environment_variable']= 'API_key' to set the API for your selected provider.
The example below is for OpenAI provider:
%load_ext jupyter_ai
import os
os.environ['OPENAI_API_KEY'] = 'add your OpenAP API key here'
Try it out:
## Load Jupyter AI extension
# %load_ext jupyter_ai
# # Set API key
# import os
# os.environ['OPENAI_API_KEY'] = 'add your OpenAP API key here'
3.7.2 Option 2: Reading API key from an external file#
Pros: Enhanced security; Separating the API key into a separate file enables sharing the notebook without exposing the key
Cons: Additional setup required; You must include the code snippet below at the start of each notebook and specify the path to your API key file
To set an API key from a file, copy and paste your API-key to a textfile, let us say ‘OPENAI_API_KEY.txt’.
Then place this code at the beginning of your file. Make sure to change the file_path_name as needed.
# # Load Jupyter AI extension
# %load_ext jupyter_ai

# #Read API key from a file
# def read_API_Key(file_name):

#     # Open the file in read mode
#     with open(file_name, 'r') as file:
#         # Read the content of the file
#         API_key = file.read().strip()  # strip() removes any leading or trailing whitespace
#     return API_key

# # Set API key
# import os
# file_path_name = 'ai_assistant/OPENAI_API_KEY.txt'
# os.environ['OPENAI_API_KEY'] = read_API_Key(file_path_name)
3.7.3 Option 3: Create an authentication module#
Pros: Versatile solution; Enables authentication for various providers from any location
Cons: Technical proficiency needed; Involves coding skills
At the beginning of my notebook, I can place these three lines to load AI magic commands and set up environment variable authentication:
%load_ext jupyter_ai
from ai_assistant import api_key  # Import the api_key module
api_key.set_API_key('OPENAI')     # Set the API key for the selected provider: 'OPENAI' or 'ANTHROPIC'
By passing the provider name to the api_key.set_API_key() function, authentication is performed based on the API key saved in a file. The module is saved somewhere on my machine, but I can import it from anywhere because I structured it as a package with __init__.py, rather than just a single Python module file as we covered in a previous lesson.
While we have not covered package structures, you can ask your generative AI model to demonstrate how to create a package like ai_assistant and develop a module such as api_key with the set_API_key function.
# %load_ext jupyter_ai
# from ai_assistant import api_key  #Import api_key module
# api_key.set_API_key('OPENAI')     #Set API key for selected Provider: 'OPENAI' and 'ANTHROPIC'
2.8 Getting help (optional)#
Let use look at the help of Jupyter AI to learn about what Jupyter AI offers and how to use this AI code assistant.
#Getting help
%ai --help
Usage: %%ai [OPTIONS] [MODEL_ID]

  Invokes a language model identified by MODEL_ID, with the prompt being
  contained in all lines after the first. Both local model IDs and global
  model IDs (with the provider ID explicitly prefixed, followed by a colon)
  are accepted.

  To view available language models, please run `%ai list`.

Options:
  -f, --format [code|html|image|json|markdown|math|md|text]
                                  IPython display to use when rendering
                                  output. [default="markdown"]
  -n, --region-name TEXT          AWS region name, e.g. 'us-east-1'. Required
                                  for SageMaker provider; does nothing with
                                  other providers.
  -q, --request-schema TEXT       The JSON object the endpoint expects, with
                                  the prompt being substituted into any value
                                  that matches the string literal '<prompt>'.
                                  Required for SageMaker provider; does
                                  nothing with other providers.
  -p, --response-path TEXT        A JSONPath string that retrieves the
                                  language model's output from the endpoint's
                                  JSON response. Required for SageMaker
                                  provider; does nothing with other providers.
  -m, --model-parameters TEXT     A JSON value that specifies extra values
                                  that will be passed to the model. The
                                  accepted value parsed to a dict, unpacked
                                  and passed as-is to the provider class.
  --help                          Show this message and exit.
------------------------------------------------------------------------------
Usage: %ai [OPTIONS] COMMAND [ARGS]...

  Invokes a subcommand.

Options:
  --help  Show this message and exit.

Commands:
  delete    Delete an alias. See `%ai delete --help` for options.
  error     Explains the most recent error.
  help      Show this message and exit.
  list      List language models. See `%ai list --help` for options.
  register  Register a new alias. See `%ai register --help` for options.
  reset     Clear the conversation transcript.
  update    Update the target of an alias. See `%ai update --help` for
            options.
  version   Prints Jupyter-AI version
The above help tells us that the magic command
%%ai [OPTIONS] COMMAND
# Or
%%ai COMMAND [OPTIONS]
invokes a language model identified by MODEL_ID, with the prompt being contained in all lines after the first.
From OPTIONS , the most important opition is -f that allows you to format your model output as code, html, image, json, markdown, math, md, or text. If this is unclear, it will be clear with an example, so let us see few examples.
You can get help on a specific command. For example, let us get help on error command:
%ai error --help
Usage: %ai error [OPTIONS] [MODEL_ID]

  Explains the most recent error. Takes the same options (except -r) as the
  basic `%%ai` command.

Options:
  -f, --format [code|html|image|json|markdown|math|md|text]
                                  IPython display to use when rendering
                                  output. [default="markdown"]
  -n, --region-name TEXT          AWS region name, e.g. 'us-east-1'. Required
                                  for SageMaker provider; does nothing with
                                  other providers.
  -q, --request-schema TEXT       The JSON object the endpoint expects, with
                                  the prompt being substituted into any value
                                  that matches the string literal '<prompt>'.
                                  Required for SageMaker provider; does
                                  nothing with other providers.
  -p, --response-path TEXT        A JSONPath string that retrieves the
                                  language model's output from the endpoint's
                                  JSON response. Required for SageMaker
                                  provider; does nothing with other providers.
  -m, --model-parameters TEXT     A JSON value that specifies extra values
                                  that will be passed to the model. The
                                  accepted value parsed to a dict, unpacked
                                  and passed as-is to the provider class.
  --help                          Show this message and exit.
2.9 Using %%ai and %ai magic commands (not very much recommended)#
2.9.1 Using magic command with default format#
Now we want to use ChatGPT-3.5 Turbo to generate a function the finds the minimum value in a list.
Here is our prompt.
Write a function that identifies the minimum value in a list without relying on the built-in min() function.
Ensure the function is capable of handling various data types and edge cases.
Run at least two test cases to validate the accuracy of the minimum value identification process.
Here is the general format:
%%ai provider:model [OPTIONS]
prompt
In that case this the provider and model would be %%ai openai-chat:gpt-3.5-turbo or simply use the provider-model aliase that is %%ai chatgpt.
Here is how to do it:
%%ai chatgpt
Function that identifies the minimum value in a list without relying on the built-in min() function
Function is capable of handling various data types and edge cases
Two test cases
def find_min_value(lst):
    if len(lst) == 0:
        return None
    min_val = lst[0]
    for i in range(1, len(lst)):
        if lst[i] < min_val:
            min_val = lst[i]
    return min_val

# Test cases
print(find_min_value([3, 8, 1, 6, 2])) # Output: 1
print(find_min_value([-5, -3, -9, -1])) # Output: -9
In our prompt, we omitted specifying Python as Jupyter AI will automatically manage the task, providing necessary details like Python version and other relevant information to achieve the desired output.
More importantly, in the above example, the default output is markdown format. We can change this with the argument [OPTION]?
2.9.2. Formatting the output#
By default the output of an %%ai command will be formatted as markdown. You can override this using the -f or --format argument to your magic command. Valid formats include: code, markdown, math, html, text, json, and image (for Hugging Face Hub’s text-to-image models).
Repeat the above example using -f code
%%ai -f code chatgpt
Function that identifies the minimum value in a list without relying on the built-in min() function
Function is capable of handling various data types and edge cases
Two test cases
def find_minimum(lst):
    if not lst:
        return None

    min_val = lst[0]
    for i in range(1, len(lst)):
        if lst[i] < min_val:
            min_val = lst[i]

    return min_val

# Test case 1
print(find_minimum([3, 5, 2, 8, 1]))  # Output: 1

# Test case 2
print(find_minimum(['apple', 'banana', 'orange', 'pear']))  # Output: 'apple'
1
apple
def find_min(lst):
    if len(lst) == 0:
        return None

    min_val = lst[0]
    for val in lst:
        if val < min_val:
            min_val = val

    return min_val

# Test case 1
test_lst1 = [3, 7, 1, 9, 2]
print(find_min(test_lst1))  # Output: 1

# Test case 2
test_lst2 = [-10, 0, 5, -3, 8]
print(find_min(test_lst2))  # Output: -10
1
-10
def find_min_value(input_list):
    if not input_list:
        return None

    min_val = input_list[0]

    for item in input_list:
        if not isinstance(item, (int, float)):
            return None
        if item < min_val:
            min_val = item

    return min_val

# Test cases
print(find_min_value([3, 6, 8, 2, 10]))
print(find_min_value([]))
2
None
def find_min_value(lst):
    if not lst:
        return None

    min_val = lst[0]
    for i in range(1, len(lst)):
        if lst[i] < min_val:
            min_val = lst[i]

    return min_val

# Test cases
test1 = [3, 5, 1, 9, 2]
print(find_min_value(test1))  # Output: 1

test2 = ['b', 'c', 'a', 'f']
print(find_min_value(test2))  # Output: 'a'
1
a
def find_min(lst):
    if len(lst) == 0:
        return None
    else:
        min_val = lst[0]
        for i in range(1, len(lst)):
            if lst[i] < min_val:
                min_val = lst[i]
        return min_val

# Test cases
print(find_min([3, 5, 1, 9, 2]))  # Output: 1
print(find_min([-10, 0, 100, -50]))  # Output: -50
1
-50
def find_minimum(lst):
    if not lst:
        return None

    min_val = lst[0]
    for i in range(1, len(lst)):
        if lst[i] < min_val:
            min_val = lst[i]

    return min_val

# Test cases
print(find_minimum([3, 5, 2, 8, 1]))  # Output: 1
print(find_minimum(['apple', 'banana', 'orange', 'pear']))  # Output: 'apple'
1
apple
Here is another example modified from Jupyter AI documentation
%%ai chatgpt -f math
Generate 3d solute transport equation
%%ai chatgpt -f md
Generate 3d solute transport equation in compact form with explaintation
The 3D solute transport equation in compact form is given as:
$$ \frac{\partial C}{\partial t} = D \nabla^2 C - \nabla \cdot (\textbf{u} C) + R $$
Where:
$C$ is the concentration of the solute,
$D$ is the diffusion coefficient,
$\textbf{u}$ is the velocity vector field,
$R$ is the reaction term.
This equation describes the change in concentration over time due to diffusion, advection, and reaction processes.
%%ai chatgpt -f markdown
Markdown code for 3d solute transport equation in LaTeX surrounded by `$$`. Do not include explanation.
$$\frac{\partial C}{\partial t} = D \nabla^2 C - \nabla \cdot (\boldsymbol{u} C) + R$$
2.9.3 The error command#
The error command explains the most recent error. For usage:
%ai error MODEL_ID
Run the code below, and use error command to understand error
# a= 1
# b= "2"
# c= 1+b
%ai error chatgpt
There have been no errors since the kernel started.
To address and rectify this error, you can utilize the list variable Err[] or In[] as illustrated below.
# %%ai chatgpt -f code
# Fix {Err[19]}
# c = str(a) + b
# a= 1
# b= "2"
# c= str(a) + b
# c = str(a) + b
Note
Using list variable Err[] is not advisable for codes with intricate formatting, as it may not yield the desired outcome.2.10 Code Interaction with list variables (not recommended)#
Pros: Enables working solely within the notebook without the need for a Chat UI interface
Cons: Limited functionality for codes with complex formatting
Jupyter AI can assist you in interacting with code or markdown cells using Python expressions like {}. You can use the special list variables In[n],Out[n], or Err[n]:
{In[n]}: Retrieves the input{Out[n]}: Retrieves the output{Err[n]}: Retrives the error
of a specific cell where n is sequential number that Jupyter notebook assign to each cell based on execution order in the notebook. This is the number on the left hand side of the cell. For instance, {In[1]} would retrieve the input of cell [1].
# {In[1]}
Now you can use these list variables to interact with your Jupyter notebook.
Taking the minimum function code above as an example, ask Jupyter AI to:
improve the code and run it for three test cases a list, dictionary, and tuple
Call the %%ai chatgpt -f code to try it out:
# %%ai chatgpt -f code
# improve the code below and run it for three test cases a list, dictionary, and tuple:
# {In[15]}
def find_minimum(iterable):
    if not iterable:
        return None

    min_val = iterable[0]
    for val in iterable:
        if val < min_val:
            min_val = val

    return min_val

# Test cases
print(find_minimum([3, 5, 2, 8, 1]))  # Output: 1
print(find_minimum(['apple', 'banana', 'orange', 'pear']))  # Output: 'apple'
print(find_minimum((45, 21, 37, 58, 12)))  # Output: 12
1
apple
12
def find_minimum(data):
    if not data:
        return None

    if isinstance(data, list) or isinstance(data, tuple):
        min_val = data[0]
        for i in range(1, len(data)):
            if data[i] < min_val:
                min_val = data[i]
        return min_val

    if isinstance(data, dict):
        return min(data.values())

# Test cases
print(find_minimum([3, 5, 2, 8, 1]))  # Output: 1
print(find_minimum({'a': 5, 'b': 3, 'c': 7, 'd': 1}))  # Output: 1
print(find_minimum(('apple', 'banana', 'orange', 'pear')))  # Output: 'apple'
1
1
apple
2.11 Code Interaction with Chat UI (recommended)#
Pros: Provides the capability to execute various tasks, as demonstrated below
Cons: Requires more typing to customize the output as desired
With Chat UI you can ask your LM to perform many coding tasks.
Complete: LM provides code completion as suggested by developer
Debug: LM debugs an error message in your code
Expalain: LM provides explanations, documentation, and insights about the code or part of the code
Translate: LM translates codes between different programming languages or paradigms like converting flowchart symbols to a code to a figure
Review: LM reviews and suggests refactoring improvements to existing code such as optimizing performance, improving readability, or adhering to best practices
Format: LM automatically adds comments, docstrings, formatting to code cell, and formatting to markdown cell
Troubleshoot: LM troubleshoots errors when installing a new package
Spellcheck: LM corrects your language errors
Improve: LM can improve your content
Chat: LM answers your questions and provide information
And much more: LM can perform many other tasks in your Jupyter notebook
The idea is simple. You have a chat user-interface that allows you to
ask questions
include selection from a code or markdown cell
replace selection from a code or markdown cell
You can try out this code completion example:
# Generate a Pandas DataFrame with daily data from 2020-01-01 to 2023-12-31 in Fort Myers, Florida
#columns:
#(1) 'TMIN' that is the minimum temperature,
#(2) 'TMAX' that is the maximum temperature,
#(3) 'PRCP' that is precipitation in inches,
#(4) 'AWDS' that is the average wind speed in miles per hour,
# (5) 'STATION' which has two stations, 'Field Airport' and 'SWF Airport'.

# The index is the date

# Display the DataFrame in JupyterLab

# Pandas operation to find rows of the days that has the maximum precipitation
# in the study period  for each of the two stations for each year

# Display the DataFrame in JupyterLab
Try this below with using the Chat UI by copying and pasting the above incomplete code below and asking your LM to complete this code and return code only
import pandas as pd
import numpy as np

# Generate data
dates = pd.date_range(start='2020-01-01', end='2023-12-31')
stations = ['Field Airport', 'SWF Airport']
data = {
    'TMIN': np.random.randint(50, 90, len(dates)),
    'TMAX': np.random.randint(70, 100, len(dates)),
    'PRCP': np.random.uniform(0, 2, len(dates)),
    'AWDS': np.random.randint(5, 15, len(dates)),
    'STATION': np.random.choice(stations, len(dates))
}

df = pd.DataFrame(data, index=dates)
df
| TMIN | TMAX | PRCP | AWDS | STATION | |
|---|---|---|---|---|---|
| 2020-01-01 | 55 | 70 | 0.640715 | 14 | SWF Airport |
| 2020-01-02 | 86 | 76 | 1.228541 | 6 | SWF Airport |
| 2020-01-03 | 69 | 71 | 1.012650 | 5 | Field Airport |
| 2020-01-04 | 53 | 76 | 1.434206 | 14 | Field Airport |
| 2020-01-05 | 56 | 91 | 1.960812 | 6 | Field Airport |
| ... | ... | ... | ... | ... | ... |
| 2023-12-27 | 54 | 81 | 0.413884 | 11 | Field Airport |
| 2023-12-28 | 74 | 87 | 1.840552 | 11 | SWF Airport |
| 2023-12-29 | 72 | 99 | 0.480547 | 9 | Field Airport |
| 2023-12-30 | 71 | 71 | 1.334216 | 11 | Field Airport |
| 2023-12-31 | 73 | 85 | 1.735492 | 11 | SWF Airport |
1461 rows × 5 columns
# Find rows with max precipitation for each station for each year
max_indices = df.groupby([df.index.year, 'STATION'])['PRCP'].idxmax()
result = df.loc[max_indices]
result
| TMIN | TMAX | PRCP | AWDS | STATION | |
|---|---|---|---|---|---|
| 2020-01-17 | 84 | 87 | 1.980529 | 11 | Field Airport |
| 2020-09-21 | 52 | 82 | 1.998162 | 5 | SWF Airport |
| 2021-08-21 | 89 | 94 | 1.994015 | 10 | Field Airport |
| 2021-10-15 | 70 | 92 | 1.999762 | 6 | SWF Airport |
| 2022-02-26 | 87 | 98 | 1.997648 | 5 | Field Airport |
| 2022-03-28 | 74 | 87 | 1.994545 | 10 | SWF Airport |
| 2023-11-12 | 74 | 92 | 1.992527 | 11 | Field Airport |
| 2023-01-18 | 55 | 77 | 1.982273 | 5 | SWF Airport |
3. Class exercise#
Complete this exercise by utilizing:
Jupyter AI,
another AI chat assistant,
or any Language Model (LM) of your preference directly without an AI chat assistant.
The exercise aims to teach the utilization of Language Models (LMs) for coding assistance and emphasizes the significance of prompt engineering.
3.1 Problem statement#
An student asked: For a Pandas DataFrame, how to display the rows of the days with the maximum precipitation for each weather station in each year in our study period and area?
3.2 Prompt engineering and code generation#
Note
Prompt engineering involves crafting and refining the language or structure of prompts to improve the performance of a language model in generating accurate and relevant responses. Mastering prompt engineering enables effective utilization of LMs across tasks from problem-solving to creative writing. Learn more with Real Python's tutorial Prompt Engineering: A Practical Example.Here is one prompt that we can start with and refine later as needed:
Generate a Pandas DataFrame with daily data from 2020-01-01 to 2023-12-31 in Fort Myers, Florida with the following columns:
(1) 'TMIN' that is the minimum temperature,
(2) 'TMAX' that is the maximum temperature,
(3) 'PRCP' that is precipitation in inches,
(4) 'AWDS' that is the average wind speed in miles per hour,
and (5) 'STATION' which has two stations, 'Field Airport' and 'SWF Airport'.

The index is the date.

Display the DataFrame to screen.

Find and display the rows of the days that has the maximum precipitation in the study period for each of the two stations for each year.
Let use see if our select LM can do this. You can use an AI code assistant such as Jupter AI or directly use any LM of your choice.
%%ai chatgpt -f code
Generate a Pandas DataFrame with daily data from 2020-01-01 to 2023-12-31 in Fort Myers, Florida with the following columns:
(1) 'TMIN' that is the minimum temperature,
(2) 'TMAX' that is the maximum temperature,
(3) 'PRCP' that is precipitation in inches,
(4) 'AWDS' that is the average wind speed in miles per hour,
and (5) 'STATION' which has two stations, 'Field Airport' and 'SWF Airport'.

The index is the date.

Display the DataFrame to screen.

Find and display the rows of the days that has the maximum precipitation in the study period for each of the two stations for each year.
import pandas as pd
import numpy as np

# Create date range
dates = pd.date_range(start='2020-01-01', end='2023-12-31', freq='D')

# Create DataFrame
data = {
    'TMIN': np.random.randint(50, 90, len(dates)),
    'TMAX': np.random.randint(70, 100, len(dates)),
    'PRCP': np.random.randint(0, 5, len(dates)) + np.random.rand(len(dates)),
    'AWDS': np.random.randint(5, 20, len(dates)) + np.random.rand(len(dates)),
    'STATION': np.random.choice(['Field Airport', 'SWF Airport'], len(dates))
}

df = pd.DataFrame(data, index=dates)

# Rows with maximum precipitation for each station in each year
max_precip_by_year = df.groupby([df.index.year, 'STATION'])['PRCP'].idxmax()
df.loc[max_precip_by_year]
| TMIN | TMAX | PRCP | AWDS | STATION | |
|---|---|---|---|---|---|
| 2020-02-06 | 60 | 75 | 4.973318 | 14.760417 | Field Airport |
| 2020-10-15 | 55 | 79 | 4.968862 | 14.590357 | SWF Airport |
| 2021-07-30 | 85 | 98 | 4.986989 | 19.605223 | Field Airport |
| 2021-01-29 | 68 | 85 | 4.991131 | 8.981538 | SWF Airport |
| 2022-04-16 | 69 | 71 | 4.974170 | 7.229039 | Field Airport |
| 2022-12-20 | 66 | 93 | 4.982344 | 12.681761 | SWF Airport |
| 2023-08-04 | 86 | 93 | 4.991889 | 17.935695 | Field Airport |
| 2023-02-10 | 74 | 75 | 4.916738 | 19.308305 | SWF Airport |
import pandas as pd
import numpy as np

dates = pd.date_range(start='2020-01-01', end='2023-12-31', freq='D')
data = {
    'TMIN': np.random.randint(50, 80, len(dates)),
    'TMAX': np.random.randint(80, 100, len(dates)),
    'PRCP': np.random.uniform(0, 2, len(dates)),
    'AWDS': np.random.uniform(5, 15, len(dates)),
    'STATION': np.random.choice(['Field Airport', 'SWF Airport'], len(dates))
}

df = pd.DataFrame(data, index=dates)

print(df)

max_precipitation = df.groupby([df.index.year, 'STATION'])['PRCP'].idxmax()
print(df.loc[max_precipitation])
            TMIN  TMAX      PRCP       AWDS        STATION
2020-01-01    59    97  0.422181  11.824475    SWF Airport
2020-01-02    50    87  0.330041  13.883931  Field Airport
2020-01-03    61    99  0.830662   7.354793    SWF Airport
2020-01-04    69    88  1.623145  10.629653    SWF Airport
2020-01-05    55    98  1.903700   8.433076    SWF Airport
...          ...   ...       ...        ...            ...
2023-12-27    61    90  0.556924   8.031571  Field Airport
2023-12-28    75    87  0.825359   7.226333    SWF Airport
2023-12-29    52    95  1.073424   9.147903  Field Airport
2023-12-30    62    93  1.482053  13.678824    SWF Airport
2023-12-31    50    80  0.881697   6.149793    SWF Airport

[1461 rows x 5 columns]
            TMIN  TMAX      PRCP       AWDS        STATION
2020-05-13    56    98  1.998317   6.809640  Field Airport
2020-03-18    65    93  1.929212  13.963665    SWF Airport
2021-02-16    75    92  1.990588  13.344931  Field Airport
2021-10-31    66    86  1.994139  13.362153    SWF Airport
2022-07-03    79    82  1.977956  11.175764  Field Airport
2022-09-21    77    97  1.935632   6.143528    SWF Airport
2023-12-15    65    97  1.934393   7.521452  Field Airport
2023-08-14    52    92  1.999846   7.392403    SWF Airport
import pandas as pd
import numpy as np

# Create date range
dates = pd.date_range(start='2020-01-01', end='2023-12-31', freq='D')

# Create DataFrame
data = {
    'TMIN': np.random.randint(50, 90, len(dates)),
    'TMAX': np.random.randint(70, 100, len(dates)),
    'PRCP': np.random.uniform(0, 2, len(dates)),
    'AWDS': np.random.randint(5, 15, len(dates)),
    'STATION': np.random.choice(['Field Airport', 'SWF Airport'], len(dates))
}
df = pd.DataFrame(data, index=dates)

# Find and display rows with maximum precipitation for each station for each year
for year in range(2020, 2024):
    for station in ['Field Airport', 'SWF Airport']:
        max_precipitation = df[(df.index.year == year) & (df['STATION'] == station)]['PRCP'].max()
        max_precipitation_rows = df[(df.index.year == year) & (df['STATION'] == station) & (df['PRCP'] == max_precipitation)]
        print(max_precipitation_rows)
            TMIN  TMAX      PRCP  AWDS        STATION
2020-07-11    70    91  1.968258     5  Field Airport
            TMIN  TMAX      PRCP  AWDS      STATION
2020-03-15    57    88  1.995829    12  SWF Airport
            TMIN  TMAX      PRCP  AWDS        STATION
2021-06-07    67    95  1.980246    14  Field Airport
            TMIN  TMAX      PRCP  AWDS      STATION
2021-06-26    70    86  1.973765     5  SWF Airport
            TMIN  TMAX      PRCP  AWDS        STATION
2022-05-02    64    93  1.995943     5  Field Airport
            TMIN  TMAX      PRCP  AWDS      STATION
2022-02-09    66    89  1.980564    14  SWF Airport
            TMIN  TMAX     PRCP  AWDS        STATION
2023-09-09    61    83  1.97562     9  Field Airport
            TMIN  TMAX      PRCP  AWDS      STATION
2023-03-16    55    85  1.992249    12  SWF Airport
This is a promising beginning.
We need to verify the output and not just rely on everything that our LM is providing. The code snippet above exhibits a few issues:
Our current LM setup does not have access to datasets.
It employs a for loop instead of utilizing Pandas operations.
It utilizes
printinstead of thedisplayfunction, which presents data in a visually appealing tabular format for Jupyter notebooks.
To tackle the first issue, we can instruct our LM to access a specific data file online or on our machine, instead of generating random data.
Let us now address the second and third problems.
3.3 Code improvement#
Ask your LM to use Pandas operations instead of for loop, and to display results in JupyterLab that is to use display instead of print function.
Here is what the LM sugguested.
# Create date range
dates = pd.date_range(start='2020-01-01', end='2023-12-31', freq='D')

# Create DataFrame
data = {
    'TMIN': np.random.randint(50, 90, len(dates)),
    'TMAX': np.random.randint(70, 100, len(dates)),
    'PRCP': np.random.uniform(0, 2, len(dates)),
    'AWDS': np.random.randint(5, 15, len(dates)),
    'STATION': np.random.choice(['Field Airport', 'SWF Airport'], len(dates))
}

df = pd.DataFrame(data, index=dates)

# Find and display rows with maximum precipitation for each year and station using Pandas operations
max_precipitation_rows = df.loc[df.groupby([df.index.year, 'STATION'])['PRCP'].idxmax()]
display(max_precipitation_rows)
| TMIN | TMAX | PRCP | AWDS | STATION | |
|---|---|---|---|---|---|
| 2020-03-13 | 82 | 78 | 1.989040 | 13 | Field Airport |
| 2020-02-28 | 70 | 82 | 1.980297 | 8 | SWF Airport |
| 2021-03-10 | 54 | 80 | 1.979329 | 13 | Field Airport |
| 2021-10-04 | 83 | 77 | 1.989374 | 12 | SWF Airport |
| 2022-12-10 | 54 | 79 | 1.994220 | 11 | Field Airport |
| 2022-08-30 | 58 | 77 | 1.990870 | 5 | SWF Airport |
| 2023-05-23 | 82 | 91 | 1.943385 | 12 | Field Airport |
| 2023-04-03 | 87 | 81 | 1.982796 | 8 | SWF Airport |
3.4 Handling challanging problems#
The above example demonstrates that our LM, which is ChatGPT 3.5 Turbo, is able to solve this relatively straightforward problem. However, a more challenging problem might require additional strategies to handle effectively.
When faced with a more complex problem, several approaches can be beneficial. I asked my LM to complete this section for me. The LM suggests the first four points. I added the heading of point 5 and asked my LM to complete it for me:
Break Down the Problem: If the problem is complex, breaking it down into smaller, more manageable sub-problems can help. Providing step-by-step instructions or dividing the problem into sequential tasks can guide the model in tackling each part systematically.
Provide Context and Examples: Offering context, examples, or related information can assist the model in understanding the problem better. Clear descriptions, relevant data samples, or background information can enhance the model’s comprehension and problem-solving capabilities.
Ask Specific Questions: Instead of presenting a broad or vague problem statement, asking specific questions or providing precise requirements can help direct the model’s attention to the key aspects of the problem.
Iterative Approach: In cases where the problem is intricate, an iterative approach may be beneficial. Engaging in a dialogue with the model, providing feedback on its responses, and refining the problem statement based on initial outputs can lead to a more targeted and accurate solution.
Consider Advanced Language Models: By leveraging a robust language model, you can potentially achieve more accurate results, handle more complex patterns, and tackle a wider range of tasks with greater efficiency.
Now let us try using different version of ChatGPT 4 in Chatbot Arena.
4. Other useful tools#
Chatbot Arena is an open-source research project developed to an open crowdsourced platform to evaluate LMs.
Let us try to use Chatbot Arena.
5. Conclusions#
Here are the key points to consider:
Pros of Language Models: These models offer the potential to improve various aspects of the coding process, spanning from initial development to code optimization.
Cons of Language Models: Drawbacks include creating a dependency on AI for coding tasks can hinder personal skill development; may result in code plagiarism and lack of originality; no guarantee of error-free code without human review; and the inability to provide creative solutions that require human insight.
Effective Prompts: Step-by-step, detailed, clear, precise, and contextually relevant prompts can proficiently guide language models towards precise and targeted responses.
AI Code Assistants: Tools like Jupyter AI can boost your Python learning and productivity by aiding in coding tasks directly within your integrated development environment (IDE), such as JupyterLab.
To sum up, AI assistanance is not here to replace the work that you do, but to help you. Try to balance the benefits of AI assistance with the need for personal skill development and critical thinking.