Lesson 9: Script Files and Modules#
This lesson is modified from Using script files and loading and using modules from geo-python.
![]()
Objectives#
By the end of this lesson, you will be able to
save functions to a script file for future use
be able to import and use a module
install and import new packages (a module or collection of modules)
1. An introduction to script files#
Up to this point we have been keeping our python code and markdown comments in a single jupyter notebook document.
This is great, but there are some cases, like when you have long python code blocks or a set of functions used in many notebooks, in which you may want to have python code in a separate document to make sure your jupyter notebook is easy to read (and use).
An alternative to typing in all of the commands you would like to run is the list them in a python script file.
A python script file is simply a file containing a list of the commands you would like to run, normally with one command per line, and formatted in the same way as if you were to type them in.
Python script files traditionally use the .py file extension in their names.
1.1 The general concept of a .py script file#
Because a python script file is simply a list of commands that you might otherwise type into a python cell in a jupyter notebook or a python console, we can quite easily create a basic script file and test things out.
1.2 Getting started#
First, we need to create a new text file by clicking on File -> New -> Python File in the JupyterLab menu bar.
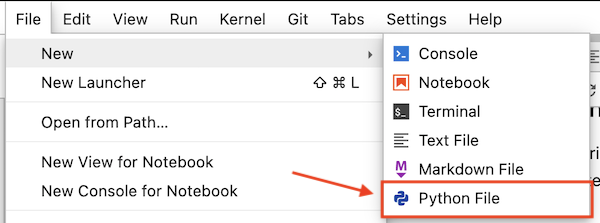
Creating a new Python file (Source: Geopython)
This will create a new tab in your JupyterLab window that should look something like that below, a blank slate.
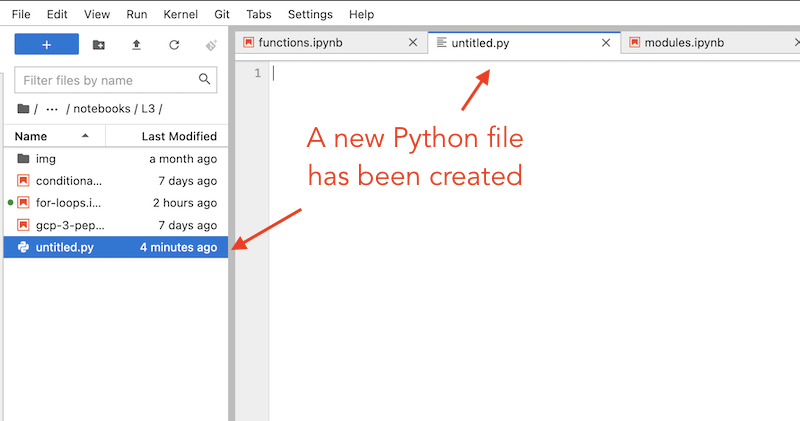
Our new Python file in JupyterLab (Source: Geopython)
Start by copying and pasting the text below into your new text file editor panel.
def celsius_to_fahr(temp_celsius):
    return 9/5 * temp_celsius + 32
1.3 Renaming our Python file#
Python scripts are just regular text files with the .py file extension that will identify them as source code for Python in JupyterLab.
By default, new Python files will be called untitled.py.
You can rename the file by right clicking on the tab titled untitled.py and renaming it as temp_converter.py.
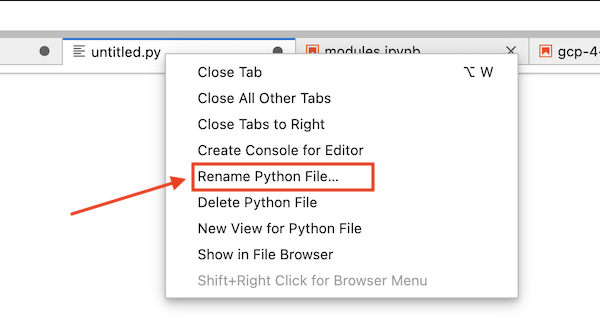
Renaming a Python file in JupyterLab (Source: Geopython)
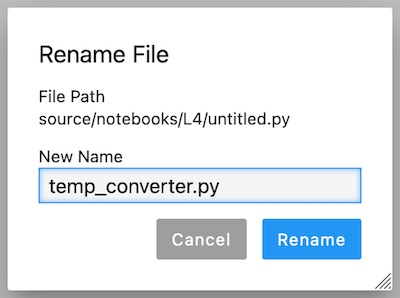
Changing the file name in JupyterLab (Source: Geopython)
Note
Be sure to save your temp_converter.py file after making your changes.
We’ll return later to some best practices for writing script files, but for now let’s continue with how to use our functions saved in the Python file we just created.
1.4 Saving functions in a script file#
Functions such as the ones we just created can also be saved in a script file and called from Jupyter notebooks.
In fact, quite often it is useful to create a dedicated function library for functions that you use frequently, when doing data analysis, for example.
Basically this is done by listing useful functions in a single .py file from which you can then import and use them whenever needed.
Basically, we’ve just seen how to save some functions to a script file.
Let’s now add the other functions we had been using to our script.
Simply copy and paste the text below into your temp_converter.py file leaving two blank lines between each function, as suggested in the PEP 8 guidelines.
def kelvins_to_celsius(temp_kelvins):
    return temp_kelvins - 273.15


def kelvins_to_fahr(temp_kelvins):
    temp_celsius = kelvins_to_celsius(temp_kelvins)
    temp_fahr = celsius_to_fahr(temp_celsius)
    return temp_fahr
Don’t forget to save your changes!
1.5 Calling functions from a script file#
Now that we have saved our temperature conversion functions into a script file we can start using them.
1.5.1 Making sure we’re in the right working directory#
Hopefully you have saved your temp_converter.py file in the same location as this Jupyter notebook (script-files.ipynb).
If so, that’s good, but we need to do one more thing to be able to start working with it.
We need to change the working directory in JupyterLab to be the one where the temp_converter.py exists.
First, we can check where we are working currently using an IPython magic command called %ls. %ls allows us to see the files located in the directory where we are currently working. You can run the %ls command in the cell below to see which files are in the current working directory.
%ls
 Volume in drive C has no label.
 Volume Serial Number is CA43-BF54

 Directory of C:\Users\aelshall\OneDrive - Florida Gulf Coast University\Data\Teaching\ENG4930_EnvDataSc\edsbook\Chapters\3. Python Programming

05/01/2025  03:50 PM    <DIR>          .
05/01/2025  03:50 PM    <DIR>          ..
04/30/2025  01:59 PM    <DIR>          .ipynb_checkpoints
04/29/2025  11:25 AM    <DIR>          __pycache__
01/29/2024  07:14 PM             1,611 Ex3.py
04/30/2025  02:00 PM            23,324 Exercise3_solution.ipynb
04/30/2025  02:00 PM            13,219 HW2.ipynb
05/01/2025  03:49 PM            48,256 Lesson6_Loops_solution.ipynb
04/30/2025  01:57 PM            17,887 Lesson7_conditional_statements_solution.ipynb
05/01/2025  03:49 PM            29,210 Lesson8_functions_solution.ipynb
05/01/2025  03:50 PM            96,795 Lesson9_modules_solution.ipynb
01/22/2024  01:58 PM             1,349 temp_converter.py
               8 File(s)        231,651 bytes
               4 Dir(s)  28,832,395,264 bytes free
In python and jupyter notebooks, the "%" symbol is used to indicate magic commands, which are special commands that are not a part of the python language itself but are specific to the IPython environment used by jupyter. These commands provide additional functionality and are prefixed with a "%" character. These magic commands can be quite handy for performing various tasks and managing the Jupyter environment. You can find a list of available magic commands by running %lsmagic in a jupyter cell.
If your output from the %ls command is the directory where you jupyter notebook is, then you are all set to continue. Otherwise, you will need to change directories to the one containing the temp_converter.py file.
You can do this using %cd like this example:
%cd my-work/notebooks/
Replace the above path to the path where your “Lesson9_script-files.ipynb” and “temp_converter.py” are.
Confirming we are in the correct directory#
At this point we can run the %ls command once more to make sure we’re in the correct directory. You should see the temp_converter.py file in the list of files and directories that are output.
%ls
 Volume in drive C has no label.
 Volume Serial Number is CA43-BF54

 Directory of C:\Users\aelshall\OneDrive - Florida Gulf Coast University\Data\Teaching\ENG4930_EnvDataSc\edsbook\Chapters\3. Python Programming

05/01/2025  03:50 PM    <DIR>          .
05/01/2025  03:50 PM    <DIR>          ..
04/30/2025  01:59 PM    <DIR>          .ipynb_checkpoints
04/29/2025  11:25 AM    <DIR>          __pycache__
01/29/2024  07:14 PM             1,611 Ex3.py
04/30/2025  02:00 PM            23,324 Exercise3_solution.ipynb
04/30/2025  02:00 PM            13,219 HW2.ipynb
05/01/2025  03:49 PM            48,256 Lesson6_Loops_solution.ipynb
04/30/2025  01:57 PM            17,887 Lesson7_conditional_statements_solution.ipynb
05/01/2025  03:49 PM            29,210 Lesson8_functions_solution.ipynb
05/01/2025  03:50 PM            96,795 Lesson9_modules_solution.ipynb
01/22/2024  01:58 PM             1,349 temp_converter.py
               8 File(s)        231,651 bytes
               4 Dir(s)  28,832,391,168 bytes free
1.5.2 Importing our script functions#
Let’s now import our celsius_to_fahr() function from the other script by adding a specific import statement in the Python cell below: from temp_converter import celsius_to_fahr
from temp_converter import celsius_to_fahr
1.5.3 Using our script functions#
Let’s also use the function so that we can see that it is working. We can print the temperature in Fahrenheit at which water freezes using our celsius_to_fahr() function in the cell below.
print(f"The freezing point of water in Fahrenheit is {celsius_to_fahr(0)}")
The freezing point of water in Fahrenheit is 32.0
You should get following output:
The freezing point of water in Fahrenheit is 32.0
1.5.4 Importing multiple functions#
It is also possible to import more functions at the same time by listing and separating them with a comma.
from my_script import func1, func2, func3
Here is an example:
from temp_converter import celsius_to_fahr, kelvins_to_fahr
1.5.5 Importing all functions from a script#
Sometimes it is useful to import the whole script and all of its functions at once. Let’s use a different import statement and test that all functions work. This time we can type import temp_converter as tc.
import temp_converter as tc
Just like the examples we have seen earlier with the math library, such as using math.sin(), we can now use our functions such as tc.celsius_to_fahr(). In the cells below, test our functions as they were used above by printing the freezing point of water in Fahrenheit, absolute zero in Celsius, and absolute zero in Fahrenheit.
temp=tc.celsius_to_fahr(0)
print(f"The freezing point of water in Fahrenheit is {temp}")
The freezing point of water in Fahrenheit is 32.0
temp=tc.kelvins_to_celsius(temp_kelvins=0)
print(f"Absolute zero in Celsius is {temp}")
Absolute zero in Celsius is -273.15
temp=tc.kelvins_to_fahr(temp_kelvins=0)
print(f"Absolute zero in Fahrenheit is {temp}")
Absolute zero in Fahrenheit is -459.66999999999996
print(tc.add_power(2,3))
(5, 8)
Note : When you add the two new functions kelvins_to_celsius and kelvins_to_fahr, and you try to call kelvins_to_celsius(), for example, you will get an error:
module 'temp_converter' has no attribute 'kelvins_to_celsius'.
Why? In Jupyter Notebooks or IPython environments, when you import a module, the imported module is cached in memory. If you make changes to the module (like adding a new function), simply re-importing the module may not reflect the changes immediately. This is because the kernel retains the previous version of the module in memory. Restarting the kernel is a way to clear the memory and reload all the modules, ensuring that any changes made to the module are applied. To do this, go to Kernel menu and select Restart kernel and you are good to go.
2. Example: Temperature calculator (optional)#
So far we have learned how to define functions with one parameter and with multiple parameters, and with one output or multiple outputs.
Let’s now make a simple temp_calculator function that accepts temperatures in Kelvins and returns values in either degrees Celsius or degrees Fahrenheit.
The new function will have two parameters:
temp_k: The parameter for passing temperature in Kelvinsconvert_to: The parameter that determines whether to output should be in Celsius or in Fahrenheit (using the lettersCorFaccordingly)
2.1 Making the function#
Let’s start defining our function by giving it a name and setting the parameters.
def temp_calculator(temp_k, convert_to):

    # Check if user wants the temperature in Celsius
    if convert_to == "C":

        # Convert the value to Celsius
        converted_temp = kelvins_to_celsius(temp_kelvins=temp_k)

    elif convert_to == "F":

        # Convert the value to Fahrenheit
        converted_temp = kelvins_to_fahr(temp_kelvins=temp_k)


    # Return the result
    return converted_temp
2.2 Adding a docstring#
Since we want to be good programmers, we should add a short docstring at the beginning of our function that tells what the function does and how the parameters work.
def temp_calculator(temp_k, convert_to):
    """
    Function for converting temperature in Kelvins to Celsius or Fahrenheit.

    Parameters
    ----------
    temp_k: numerical
        Temperature in Kelvins
    convert_to: str
        Target temperature that can be either Celsius ('C') or Fahrenheit ('F'). Supported values: 'C' | 'F'

    Returns
    -------
    converted_temp: float
        Converted temperature.
    """

    # Check if user wants the temperature in Celsius
    if convert_to == "C":

        # Convert the value to Celsius using the dedicated function for the task that we imported from another script
        converted_temp = kelvins_to_celsius(temp_kelvins=temp_k)

    elif convert_to == "F":

        # Convert the value to Fahrenheit using the dedicated function for the task that we imported from another script
        converted_temp = kelvins_to_fahr(temp_kelvins=temp_k)

    # Return the result
    return converted_temp
You can copy this to a file and rename it “temp_converter.py”
help(tc.temp_calculator)
Help on function temp_calculator in module temp_converter:

temp_calculator(temp_k, convert_to)
    Function for converting temperature in Kelvins to Celsius or Fahrenheit.

    Parameters
    ----------
    temp_k: <numerical>
        Temperature in Kelvins
    convert_to: <str>
        Target temperature that can be either Celsius ('C') or Fahrenheit ('F'). Supported values: 'C' | 'F'

    Returns
    -------
    <float>
        Converted temperature.
2.3 Using the temp_calculator function#
Add this function to your “temp_converter.py”, and do not forget to restart the kernel in order not to get an error.
Now, let’s use it.
import temp_converter as tc
temp_kelvin = 30
temperature_c = tc.temp_calculator(temp_k=temp_kelvin, convert_to="C")
print(f"Temperature {temp_kelvin:.2f} in Kelvins is {temperature_c:.2f} in Celsius")
Temperature 30.00 in Kelvins is -243.15 in Celsius
3. Modules, packages and libraries?#
Python module refers to a piece of python code that is designed to execute a spesific task. Technically, modules are simply python script files (file extension.py) that contain function definitions and other statements. Python packages are a way of organizing modules into larger entities. The words “module”, “package” and “library” are often used interchangeably.
3.1 Loading modules#
Python modules can be loaded in a number of different ways.
3.1.1 Loading whole module#
Python modules can be loaded in a number of different ways.
Let’s start simple with the math module.
Here, we’ll load the math module using the import statement and try out some of the functions in the module, such as the square root function sqrt.
import math
math.sqrt(81)
9.0
Here we have loaded the math module by typing import math, which tells Python to read in the functions in the math module and make them available for use.
In our example, we see that we can use a function within the math library by typing the name of the module first, a period, and then the name of function we would like to use afterward (e.g., math.sqrt()).
Built-in functions#
Built-in functions such as print() are always available without importing anything:
print("Hello world!")
Hello world!
Technically, the built-in functions belong to a module called builtins.
3.1.2 Loading whole module with renaming#
We can also rename modules when they are imported.
This can be helpful when using modules with longer names.
Let’s import the math module but rename it to m using the format import module as name.
Then we can using the sqrt function from the math library and check the type of our module named m.
import math as m
m.sqrt(49)
7.0
type(m)
module
Here, we imported the math module to be usable with the name m instead of math. We will see other examples later in the course where using an alternate name is rather useful. For example, next week we will start using the pandas library for data analysis. It is customary to import pandas as pd:
import pandas as pd
3.1.4 Importing a single function#
It is also possible to import only a single function from a module, rather than the entire module.
This is sometimes useful when needing only a small piece of a large module.
We can do this using the form from module import function.
Let’s import the sqrt function from the math module using this form.
Again, we can test using our resulting function afterward.
from math import sqrt
sqrt(121)
11.0
Though this can be useful, it has the drawback that the imported function could conflict with other built-in or imported function names, and you lose the information about which module contains the imported function. You should only do this when you truly need to.
3.1.5 Importing a submodule#
Some modules have submodules that can also be imported without importing the entire module. We may see examples of this later when making data plots using the pyplot sub-module of the Matplotlib module. In case you’re curious, here is an example.
Note: When importing matplotlib you may get the following error
ModuleNotFoundError: No module named 'matplotlib'
because you still did not install it. You need to first install matplotlib. Using pip install, you can type the flowing in a new code cell
pip install matplotlib
that will install the package for you. It is not a small package so installation can take minutes. Do not forget to restart the kernel before using your new package. For more infromation: 4. Installing packages
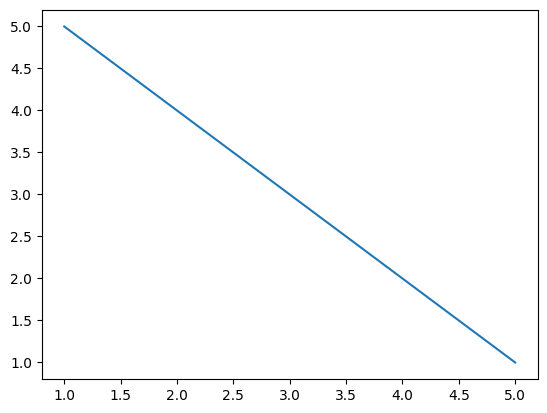
import matplotlib.pyplot as plt
# Plot a simple x y line graph with default settings
plt.plot([1, 2, 3, 4, 5], [5, 4, 3, 2, 1])
[<matplotlib.lines.Line2D at 0x1a9d4946f00>]
You can read more about the plotting function in matplotlib pyplot documentation. We will introduce matplotlib in detail later.
3.2 Using module functions#
As we see above, the easiest way to use a module is to import it an then use its functions by typing modulename.functionname() and providing the necessary arguments.
Yes, it is that simple.
However, there are times you may not know the names of all of the functions in a given module, or which are part of a module.
You can view the list of functions that are part of a module by using the dir() function.
import math
print(dir(math))
['__doc__', '__loader__', '__name__', '__package__', '__spec__', 'acos', 'acosh', 'asin', 'asinh', 'atan', 'atan2', 'atanh', 'cbrt', 'ceil', 'comb', 'copysign', 'cos', 'cosh', 'degrees', 'dist', 'e', 'erf', 'erfc', 'exp', 'exp2', 'expm1', 'fabs', 'factorial', 'floor', 'fmod', 'frexp', 'fsum', 'gamma', 'gcd', 'hypot', 'inf', 'isclose', 'isfinite', 'isinf', 'isnan', 'isqrt', 'lcm', 'ldexp', 'lgamma', 'log', 'log10', 'log1p', 'log2', 'modf', 'nan', 'nextafter', 'perm', 'pi', 'pow', 'prod', 'radians', 'remainder', 'sin', 'sinh', 'sqrt', 'sumprod', 'tan', 'tanh', 'tau', 'trunc', 'ulp']
You can also browse the available modules by typing in modulename. and then pressing the Tab key:

So that’s helpful, but what about when you don’t know what a given function does?
The easiest solution is to use the help() function (after importing the module).
Let’s check the help for the math.sin function.
help(math.sin)
Help on built-in function sin in module math:

sin(x, /)
    Return the sine of x (measured in radians).
3.3 What should I not do?#
Here are a few things to avoid.
3.3.1 Using from X import *#
Don’t use from X import *.
This may be easier to understand by way of an example, but assuming X above is a Python module, from X import * will import all of the functions in module X.
Though you might think this is helpful, it is much better to simply import X or import X as Y to keep the connection between the functions and their module.
It is also much more likely you will encounter conflicting names when using from X import *.
3.3.2 Poor names when renaming on import#
When importing popular Python packages, there are some conventional short names that are commonly used across the Python community. These conventions are not strict rules, but following them can improve code readability and make your code more consistent with the broader Python ecosystem. Here are some common short names for popular python packages:
import math
import pandas as pd
import numpy as np
import matplotlib.pyplot as plt
import seaborn as sns
import sklearn
import tensorflow as tf
import torch
If you want to make the module name shorter on import, pick a reasonable abbreviation.
For instance, import matplotlib as m could be confusing, especially if you’re also using import math as m in other Jupyter notebooks or script files.
Similarly, import matplotlib as math is perfectly OK syntax in python, but bound to cause a world of trouble.
Remember, people need to be able to read and understand the code you write, keep it simple and logical.
3.3.3 Importing modules along the way instead of on the top#
What does PEP 8 say about imports? According to good coding practices described in PEP 8, we should always import modules at the top of the file. In this lesson, we are demonstrating how to import different modules along the way, but in general it would be better to import requried modules as the very first thing. PEP 8 refers more to traditional script files, but we can apply the guideline to Jupyter Notebook files by placing our imports the first code cell in the Jupyter Notebook.
4. Installing packages#
It’s also good to be aware of pip, the package installer for python. Mamba is another package installer for python that provides package management system. For example, with Mamba you can list installed package names and versions using the mamba list command. Pip and Mamba are often used for similar purposes, but the key difference is that pip is used for installing packages written in python, while Mamba handles packages that might also contain code written in other languages.
Checking all available modules in a Jupyter Notebook
In a Jupyter Notebook, you can type in help("modules") to check the complete list of installed packages in Python. However, the output is a bit clumsy and hard to read…
You can try help("modules") below.
# List all available modules.
# Note: when running this command, you might first get several warnings related to deprecated packages etc.
help("modules")
Please wait a moment while I gather a list of all available modules...
# 2025-05-01 20:33:53,548 INFO faiss.loader loader.py:113 -- Loading faiss with AVX512 support.
# 2025-05-01 20:33:53,549 INFO faiss.loader loader.py:118 -- Could not load library with AVX512 support due to:
ModuleNotFoundError("No module named 'faiss.swigfaiss_avx512'")
# 2025-05-01 20:33:53,549 INFO faiss.loader loader.py:125 -- Loading faiss with AVX2 support.
# 2025-05-01 20:33:53,762 INFO faiss.loader loader.py:127 -- Successfully loaded faiss with AVX2 support.
# 2025-05-01 20:33:53,773 INFO faiss __init__.py:185 -- Failed to load GPU Faiss: name 'GpuIndexIVFFlat' is not defined. Will not load constructor refs for GPU indexes.
C:\Users\aelshall\AppData\Local\miniconda3\Lib\pkgutil.py:93: LangChainPendingDeprecationWarning:

langchain.indexes.prompts will be removed in the future.If you're relying on these prompts, please open an issue on GitHub to explain your use case.
C:\Users\aelshall\AppData\Local\miniconda3\Lib\pkgutil.py:93: LangChainDeprecationWarning:

As of langchain-core 0.3.0, LangChain uses pydantic v2 internally. The langchain.pydantic_v1 module was a compatibility shim for pydantic v1, and should no longer be used. Please update the code to import from Pydantic directly.

For example, replace imports like: `from langchain.pydantic_v1 import BaseModel`
with: `from pydantic import BaseModel`
or the v1 compatibility namespace if you are working in a code base that has not been fully upgraded to pydantic 2 yet. 	from pydantic.v1 import BaseModel
C:\Users\aelshall\AppData\Local\miniconda3\Lib\pkgutil.py:93: LangChainDeprecationWarning:

As of langchain-core 0.3.0, LangChain uses pydantic v2 internally. The langchain_core.pydantic_v1 module was a compatibility shim for pydantic v1, and should no longer be used. Please update the code to import from Pydantic directly.

For example, replace imports like: `from langchain_core.pydantic_v1 import BaseModel`
with: `from pydantic import BaseModel`
or the v1 compatibility namespace if you are working in a code base that has not been fully upgraded to pydantic 2 yet. 	from pydantic.v1 import BaseModel